You are here: SwitchKit® Development Environment - CSA User’s Guide > 2 Basic Configuration - System/Node > Adding a Node Offline

This procedure describes the offline configuration of a node within the CSA. To configure offline means that the CSA is not connected to a CSP.
Before you begin
Open the CSA. The LLC and the SwitchManager do not need to be started.
The following steps explain the offline configuration of a node.
1 To start configuration offline, do one of the following:
• Go to the File menu, select New Configuration. This opens the global view which displays the Configuration icon.
• Go to the File menu, select Open Configuration. Select the file you want to open from the Open dialog box. This displays the Configuration icon.
2 After the Configuration icon is shown, you can access the configuration menus. To continue configuration, do one of the following:
• Right-click the Configuration icon and select Add New Node.
• Left-click the Configuration icon to activate it (an activated configuration box has a double-line border). On the menu, go to Configuration® System® Add New Node.
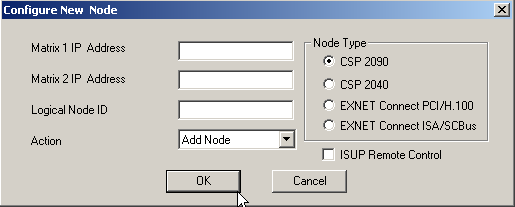
The Configure New Node dialog box opens. See the next screen shot.

3 Enter the matrix IP Address(es) and Logical Node ID. The valid range of logical node IDs is: 0-254. Select the node type you want to add by clicking the corresponding radio button.
Important! Select the option to enable ISUP Remote Control, if you want to use a multi-node system without an EXNET® (ring) card.
4 Click OK in the Configure New Node dialog box. The CSA displays a configured node within the Configuration icon.
5 Double-click the node icon, a node view opens.
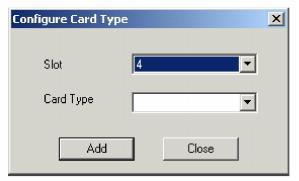
6 Right-click an empty slot in the configuration node view and select Add Card. The Configuration Card Type dialog box opens. See the next screen shot.

7 Specify the Card Type and click Add. Repeat this for all cards you want to add.
Important! Be sure to select the card type that corresponds to the card in the physical slot of the CSP. You can move a card to a different slot by right-clicking the card and then select Change Slot Number on the pop-up menu.
8 Click Close to close the Configure Card Type dialog box. You are now ready to start configuring line cards, spans, and channels. Go to Configuring Line Cards, Spans, and Channels.
