 If a card is added, removed, or reconfigured in a slot with another card already in place, that card and the specified configuration will be lost.
You are here: SwitchKit CSA User’s Guide > 2 Basic Configuration - System/Node > Adding Cards to a Node

This procedure describes how to add cards to a node.
Before you begin
To add cards you must open a node view window.
Adding Cards to a Node
The following steps explain how to add cards to a node.
If a card is added, removed, or reconfigured in a slot with another card already in place, that card and the specified configuration will be lost.
1 To add a card, do one of the following:
• Right-click an empty slot in the node view window and select Add Card.
• With the node view window opened, go to the Configuration menu and select Node Configuration®Add Card.
This opens the Configure Card Type dialog box. The selections shown in the screen below are example selections.
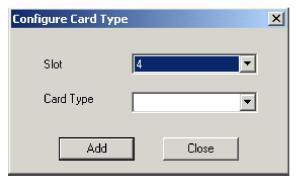
2 Select a Card Slot from the drop-down list if an empty slot was not already selected.
If a card is added, removed, or reconfigured in a slot with another card already in place, that card and the specified configuration will be lost.
3 From the drop-down list, select the Card Type that corresponds to the card in the physical slot of the CSP. You can move a card to a different slot by right-clicking the card and selecting Change Slot Number on the pop-up menu.
4 Click Add.
5 Repeat steps 2 to 4 for each card you want to add.
6 Click Close. All the cards you added are now displayed in the node view window.
From the node view, you can populate the cards from an online system, please refer to Adding a Node Online, Step 6.

Note
Configuration changes are not sent to the CSP until you select the menu: Configuration®Configure Through SwitchMgr ®Send Only Modified Configuration To Switch.