Adding an EXNET Connect Node Online

This procedure describes the online configuration of an Connect node within the graphical user interface.
Before you begin
The node to be added must already have system software downloaded through a TFTP server. The LLC and SwitchManager must be running. For information on starting the LLC and SwitchManager, refer to the SwitchKit documentation set.
Configuring the Node Online
The following steps explain the online configuration of a node.
 If you already have other nodes configured, selecting the menu option Configure® Configure Through SwitchMgr® Send All Configurations to Switch takes those nodes out-of-service. Use Send All Configurations to Switch only when creating a new system configuration. Send All Configurations to Switch replaces any previous configuration. When adding a node to an already-configured system, select the menu option Configure® Configure Through SwitchMgr® Send Only Modified Configuration to the Switch.
1 Go to the File menu, select New Configuration.
The Configuration icon opens in the global view.
2 When the Configuration icon appears, you can access the configuration menus. To access the configuration menus, do one of the following:
• Right-click the Configuration icon and select Add New Node.
• Left-click the Configuration icon to activate it (an activated configuration box has a double-line border). On the menu, go to Configuration® System® Add New Node.
The Configure New Node dialog box opens.
3 Enter the Address and Node ID. The valid range of logical node IDs is: 0-254. Select the node type you want to add by clicking the corresponding radio button.
Important! The EXNET Connect card does not support redundancy.
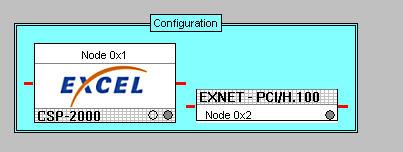
4 Click OK in the Configure New Node dialog box. When you select EXNET Connect /H100 as the node type, the CSA displays an EXNET Connect node beside an existing node. See the next screen shot.
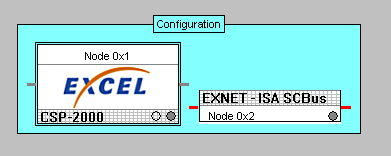
The next screen shot shows the Exnet Connect /SC node, if you selected that as the node type.
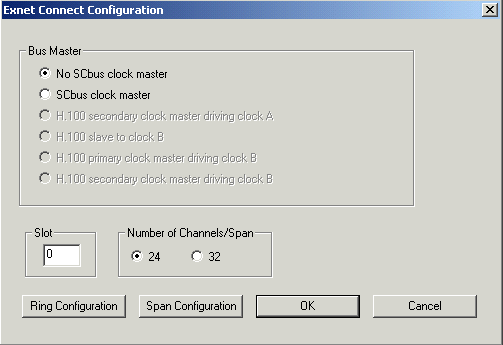
5 Double-click the EXNET node. If you selected the EXNET- PCI/H100 node, the Exnet Connect Configuration dialog box opens, showing that node’s configuration dialog box.
If you selected the EXNET - ISA/SC bus node, the Exnet Connect Configuration dialog box opens, showing that node’s configuration dialog box.
6 Select the Bus Master. Enter the Slot number (The valid range is 0-31). Select the Number of Channels/Spans and the Speed when configuring an EXNET - PCI/H100 node.
Important! When configuring spans for a format, select 24 for the Number of Channels/ field.When configuring spans for an format, select 32 for this field.
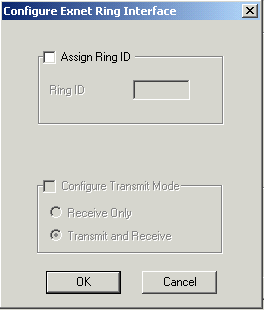
7 After configuring the EXNET Connect node, you must configure this node to connect to a ring. Click Ring Configuration. The Configure Exnet Ring Interface dialog box opens.
8 Select Assign Ring ID and enter the Ring ID.
9 Select Configure Transmit Mode and select the option you want to use. Click OK.
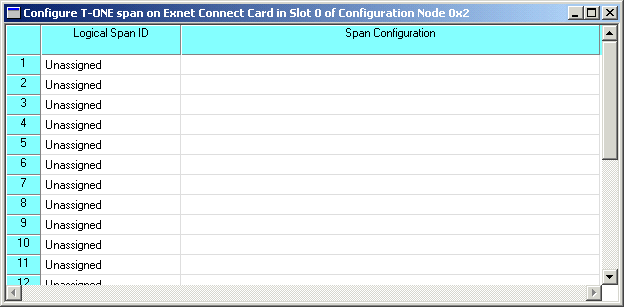
10 When the focus returns to the Exnet Connect Configuration dialog box, click the Span Configuration button. The Configure T-ONE span on Exnet Connect Card ... dialog box opens. Or, if you selected 32 channels in the Exnet Connect Configuration dialog box, the Configure E-ONE span on Exnet Connect Card... will open. For more information on configuring these line cards, see the procedures on Configuring the T-ONE Card or Configuring the E-ONE Card in the User’s Guide, release 8.1.1 . See the next screen shot for an example of a Configure T-ONE span... dialog box.
For more details on span configuration see the table on the next page.
Depending on the bus configuration, the actual number of spans displayed will differ. See the next table.
|
Node Type
|
Span Configuration
|
|
ISA/SC bus
clock speed = 4 MHz
|
Maximum of 21 T1 spans
OR
Maximum of 16 E1 spans
|
|
PCI/H100 bus
clock speed = 4 MHz
|
Maximum of 21 T1 spans
OR
Maximum of 16 E1 spans
|
|
PCI/H100 bus
clock speed = 8 MHz
|
Maximum of 80 T1 spans
OR
Maximum of 64 E1 spans
|

Note
You can now make changes to your system configuration or do any provisioning that is required. Remember that changes under all menus other than the configuration menus are executed immediately. Configuration changes are not sent to the EXS CSP until you select the menu: Configuration® Configure Through SwitchMgr® Send All Configurations To Switch or Configuration® Configure Through SwitchMgr® Send Only Modified Configuration To Switch.