You are here: SwitchKit CSA User’s Guide > 2 Basic Configuration - System/Node > Configuring Multiple Hosts

This procedure describes how to configure a CSP node for multiple hosts. Cantata Technology recommends that you contact Technical Support for assistance before using this procedure.
Before you begin
You must have a node view window open in configuration mode.
Configuring Multiple Hosts
Follow the steps below to configure multiple hosts:
1 To enter the configuration dialog box for the multi-host configuration, do one of the following:
• Right-click in blue area of the node view window, and select Multi-Host Configuration from the pop-up menu.
• With the node view window open, go to the Configuration menu and select Node Configuration®Multi-Host Configuration.
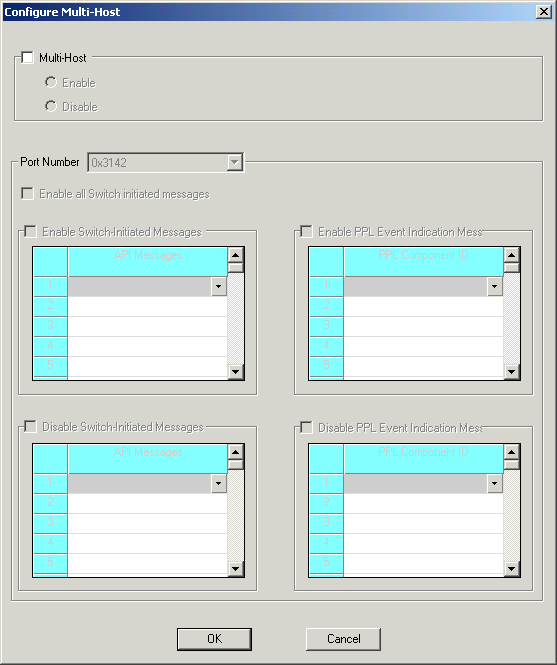
The Configure Multi-Host dialog box opens. See the next screen shot
This dialog box opens with the default settings shown.

2 Select the Multi-Host check box to activate the field. In the Multi- Host field, either Enable or Disable the Multi-host configuration.
3 When the Multi-Host is enabled the Port Number field gets activated. You can keep the default port number or change the number through the drop-down menu and do the configuration for the specified port.
4 You can Enable or Disable All Switch Initiated Messages using the check boxes.
5 If you want to Enable or Disable some of the Switch Initiated Messages select the check boxes for the tables. Specify the messages you want to enable or disable in those tables.
6 If you want to Enable or Disable PPL Event Indication Messages select the check boxes for the tables. Specify the messages you want to enable or disable in those tables.
7 Click OK to close the Configure Multi Host dialog box.

Note
This procedure must be repeated for each multi-host port. Configuration changes are not sent to the CSP until you select the menu: Configuration®Configure Through SwitchMgr ®Send Only Modified Configuration To Switch.