 When the Transmit/Receive Mode is configured, the EXNET ring resets and comes back in service. All inter-nodal calls are purged during the reset.
You are here: CSP Developer’s Guide: Overview > 10 Configuring Multi-Node Systems > In-Service Upgrades

This section explains the procedures and contingencies for adding components to an active multi-node or single-chassis CSP.
Adding an EXNET® Ring to Stand-alone Chassis
You can create a multi-node CSP from two or more stand-alone CSPs by adding EXNET® hardware to each node without affecting existing calls on any nodes.
1. Add EXNET® hardware to each node
• EXNET-ONE
• Fiber optic cable
2. Assign Logical Node IDs to each node (Assign Logical Node ID)
3. Configure the EXNET® ring (EXNET Ring Configure)
• Assign Logical Ring ID to each node
• Configure Transmit/Receive Mode of each node
4. Bring the ring in service (Service State Configure)
• This message only needs to be sent to one node to bring the entire ring in service
Calls can now be connected across nodes.
The procedure for adding a node is the same for a redundant or non-redundant EXNET® ring configuration. However, adding a node to a non-redundant ring configuration causes some inter-nodal calls to purge while the ring resets.
See also Adding a Node to a Multi-Node System (7-60) in the EXS SwitchKit Converged Services Administrator (CSA) User’s Guide for instructions on completing this procedure with CSA.
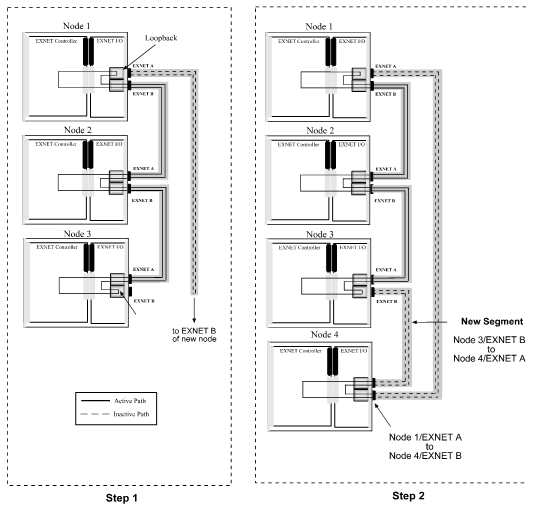
Adding a Node to a Non-redundant EXNET® Ring
Follow the steps below to add a node to a non-redundant ring configuration. This procedure assumes the configuration explained in the section Configure Transmit/Receive Mode. For this example, assume that the EXNET® ring is assigned Logical Ring ID 1.
1. Disconnect the EXNET® ring where necessary.
2. Disconnect the fiber optic cable from the EXNET B port of the node that will be adjacent to the new node. The system is placed in loopback mode and all connections are maintained.
3. Make the EXNET® connections to the new node.
4. Configure the node as follows:
• Establish the Ethernet connection.
• Download the system software.
• Re-establish the socket connection.
• Assign Logical Node ID.
• Configure CSP options on the node, if necessary (EXS Node Configure).
• Assign Logical Ring ID 1 to the ring (EXNET Ring Configure).
5. Configure the Transmit/Receive Mode of the ring (EXNET Ring Configure).
When the Transmit/Receive Mode is configured, the EXNET ring resets and comes back in service. All inter-nodal calls are purged during the reset.
Adding a Node to a Redundant EXNET® Ring
Follow the steps below to add a node to a redundant ring configuration. This procedure assumes the configuration shown in Adding a Node to an EXNET® Ring. For this example, assume that the EXNET® rings are assigned Logical Ring IDs 1 and 2.
1. Disconnect the EXNET® ring where necessary: Disconnect the fiber optic cable from the EXNET B port of the EXNET-ONE cards in the node that will be adjacent to the new node (both Ring 1 and Ring 2). Both rings are placed in loopback mode and all connections are maintained.
2. Make the EXNET® connections to the new node for both rings
3. Configure Node
• Establish the Ethernet connection
• Download the system software
• Re-establish the socket connection
• Assign the Logical Node ID
• Configure CSP options on the node, if necessary (EXS Node Configure)
4. Configure Ring 1
• Assign Logical Ring ID 1 to the EXNET-ONE that is attached to Ring 1 (EXNET Ring Configure)
• Configure the Transmit/Receive Mode of Ring 1 (EXNET Ring Configure)
Ring 1 resets and comes in service with the new node attached. All inter-nodal calls are maintained on Ring 2 while Ring 1 is resetting.
5. Configure Ring 2
• Assign Logical Ring ID 2 to the EXNET-ONE that is attached to Ring 2
(EXNET Ring Configure).
• Configure the Transmit/Receive Mode of Ring 2 (EXNET Ring Configure). Ring 2 resets and comes in service with the new node attached. All inter-nodal calls are maintained on Ring 1 while Ring 2 is resetting.
Figure 10-11 Adding a Node to an EXNET® Ring