You are here: Hardware Installation and Maintenance > 6 CSP Maintenance > CSP 2090/CSP 2110 Fan Trays

Overview
The CSP 2090 and CSP 2110 chassis have front (lower) and rear (upper) fan trays.
Replacing the Lower Fan Tray Filter
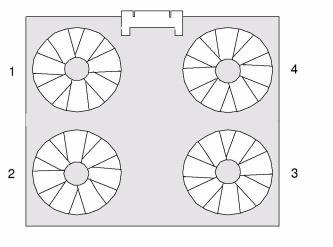
The lower fan tray at the front of the chassis contains four fans that take in air through a vent. The fans in the fan tray are numbered. (Fan Numbering of Installed Lower Fan Tray )
The lower fan trays for the CSP 2090 and CSP 2110 have the following dimensions:
|
Dimensions |
CSP 2090 |
CSP 2110 |
|---|---|---|
|
Height |
7.0 cm (2.75") |
5.7 cm (2.25") |
|
Width |
42.5 cm (16.75") |
42.5 cm (16.75") |
|
Depth |
31.7 cm (12.5") |
31.7 cm (12.5") |
Figure 6-2 Fan Numbering of Installed Lower Fan Tray
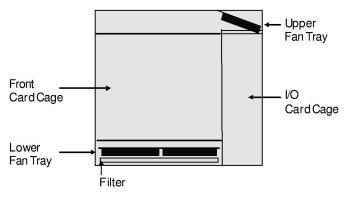
A filter is located under the lower fan tray. (Fan Trays – Cross-Sectional Side View of Chassis)
Figure 6-3 Fan Trays – Cross-Sectional Side View of Chassis
Excel recommends checking this filter monthly to prevent system contamination and overheating caused by particulate accumulation. Replacement schedules will vary, depending on the site.
Follow the instructions below to check or replace the lower fan tray filter:
Important! You do not have to turn the power OFF before removing the filter.
 Excel recommends not running a system for more than 10 minutes without a fan tray installed.
1 Loosen the two screws at both ends of the fan tray door and remove the fan tray door.
2 Gently pull the handle on the fan tray (Front of Lower Fan Tray) and slide the fan tray out of the chassis.
Figure 6-4 Front of Lower Fan Tray
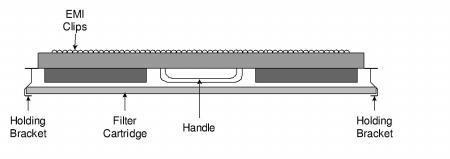
3 Remove the filter cartridge from the holding brackets.
4 If the filter is not dirty, insert it back into the holding brackets with the metal grid facing up. Otherwise, replace it with a new filter.
Do not try to clean the filter. A partially cleaned filter that is installed upside-down will contaminate the system. The deterioration of filter matter will also contaminate the system.
5 Slide the fan tray into the chassis, re-install the fan tray door, and tighten the two screws that secure the door to the chassis.
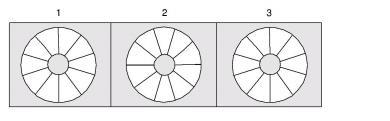
The rear fan tray at the top of the chassis contains three fans that discharge the exhaust from the CSP 2090 and CSP 2110. The fans in the fan tray are numbered. (Fan Numbering - Overhead of installed Upper Fan Tray )
The rear fan tray has the following dimensions:
|
Dimensions |
CSP 2090 |
CSP 2110 |
|---|---|---|
|
Height |
7.2 cm (2.85") |
11.2cm (4.4") |
|
Width |
43.5 cm (17.0") |
43.5 cm (17.0") |
|
Depth |
21.0 cm (8.25") |
31.7 cm (12.5") |
Figure 6-5 Fan Numbering - Overhead of installed Upper Fan Tray
The rear fan tray is located at the top rear of the chassis.(Upper Fan Tray at Rear of Chassis )
Figure 6-6 Upper Fan Tray at Rear of Chassis
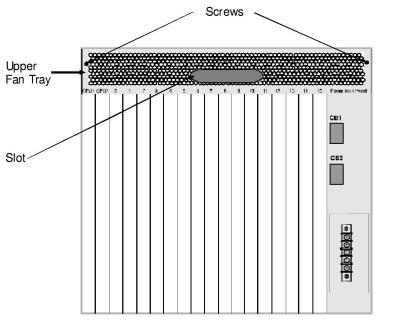
This fan tray does not have a filter, so maintenance is unnecessary. If you need to remove the rear fan tray, complete the following steps:
Important! You do not have to turn the power OFF before removing the fan tray.
1 Loosen the two screws at both ends of the fan tray unit.
2 Reach into the slot in the vent and pull the vent to unseat the tray.
3 Slide the tray out of the chassis.