Configuring SIP

This procedure describes the configuration of the CSP Session Initiation Protocol () which is embedded in the card and interacts with host applications.
Before you begin
For offline configuration, you must have a node view window open in configuration mode. If you want to configure online, the LLC and SwitchManager must be running. For information on running LLC and SwitchManager refer to the SwitchKit documentation. If you plan to install VDAC cards, we recommend configuring VDAC parameters, such as Addresses and spans before you start configuring CSP SIP.
Before you configure CSP SIP, you must locate your license file (license.cfg) which contains a license key. The license file is included on a floppy disk that is shipped with the CSP system software CD. Copy the file to your folder. To install the license key, you must use the General Node Configuration dialog box. See General Node Configuration for the procedure on opening the license key. SIP licensing is processed through the matrix controller card.
Information Source
For information beyond the default values provided, please refer to VDAC and CSP SIP information in the , Developer’s Guide: Internet Protocol.
Configuring CSP SIP
The following steps explain the CSP SIP configuration.
 If you do not want to enable the CSP SIP, you must close the dialog box with the Cancel button. The CSP SIP Configuration dialog box opens with default values assigned. Once you send the configuration to the switch, the CSP SIP will be enabled. Once enabled, there is no user interface to disable the CSP SIP.
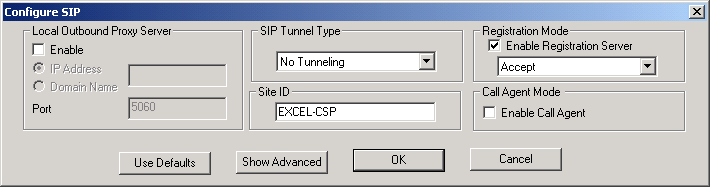
1 To open the CSP SIP Configuration dialog box, do one of the following:
• Select the matrix controller card in the node view. Go to the Configuration menu and select SIP®SIP Configuration.
• Right-click the node view window (outside the card slots) and select SIP Configuration from the menu list.
The dialog box opens showing only the common settings and default values. The default values work for many cases. If you need to change any of the default values, please follow the next steps.
2 Enable the Local Outbound configuration and enter the and information. The IP Address is not mandatory. The Local Outbound Proxy configuration is disabled by default.
3 Select the SIP Tunnel Type from the drop-down list. By default, this field is set to No Tunneling.
4 Enter the Site ID. This field is limited to 64 characters. The default Site ID is Excel-CSP. This is used to create the Call ID header in the CSP SIP message.
5 For the Registration Mode, Enable the Registration Server is checked by default. You can change the default option Accept by selecting another registration behavior from the drop-down menu.
6 If you want to enable Call Agent Mode, select the check box. To enable this feature you must have a license. See Configuring the Call Agent.
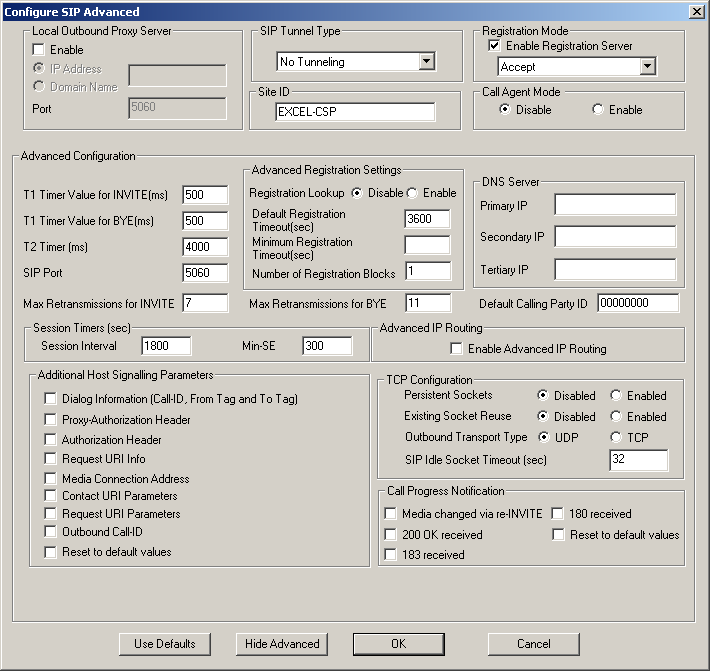
7 If you want to enter the advanced configuration settings, click the Show Advanced button. The SIP Configuration, Advanced dialog box opens.
This dialog box contains all the settings you specified in the Configure SIP dialog box and provides more SIP configuration fields. Use the TAB key to move through the dialog box.
8 Under Advanced Configuration, if you want to use values different from the default ones, enter the following:
• TI Timer Value for INVITE (ms)
• TI Timer Value for BYE (ms)
• T2 Timer (ms)
• SIP Port
Important! The value, 5060, specified for SIP Port is is a well-known UDP SIP port.
9 Enter the Max Retransmissions for INVITE value.
10 In the Advanced Registration Settings group, you can select Enable for Registration Lookup. Once the registration server is enabled, you may want to specify the Registration Timeout value and the Number of Registration Blocks. This number can be 1 or 2. Once you have configured SIP with either 1 or 2, you can change that configuration only when you cycle the power.
11 If you want to use a value different from the default one, enter the Max Retransmissions for BYE value.
12 For the Server, enter the Primary IP, the Secondary IP, and the Tertiary IP.
13 Enter the Default Calling Party ID. This field needs to contain data. By default, the value is a string of zeros.
14 If you want to use values different from the default ones, enter Session Timers for the Session Interval and Min-SE.
15 Under Advanced IP Routing, if you want to enable this option, select it.
16 If you want to use Additional Signaling Parameters, you can select any of the following:
• Dialog Information (Call-ID, From Tag and To Tag)
• Proxy-Authorization Header
• Authorization Header
• Request URI Info
• Media Connection Address
• Contact URI Parmeters
• Request URI Parmeters
• Reset to default values
17 If you want to use Call Progress Notification, you can select any of the following:
• Media changed via re-INVITE
• 200 OK received
• 183 received
• 180 received
• Reset to default values
18 Under TCP Configuration, for Persistent sockets, select Enabled if you do not want the default, Disabled.
19 For Existing Socket Reuse, select Enabled if you do not want the default, Disabled.
20 For the Outbound Transport Type, select TCP if you do not want the default, UDP.
21 If you want to use a value different from the default one, enter a value for the SIP Idle Socket Timeout (sec).
22 If you want this option, select Enable Caller ID in Ack.
23 Click OK after you have specified all your CSP SIP configuration settings.

Note
Configuration changes are not sent to the CSP until you select the menu: Configuration® Configure Through SwitchMgr® Send Only Modified Configuration To Switch.